Which RN-XV library to use?

I spent a while going through lots of different WiFi libraries before I found one that made things easy. Eventually I’ve settled on dpslwk‘s version of the WiFly library here and there’s one big reason why:

The WiFlyClient class inherits from Client meaning it can be dropped in as a replacement for the standard Ethernet library.

That said, there’s still a little bit of work to do if you don’t want to use the shield as that uses SPI communication and without the shield, you’re stuck with normal uart. Here’s a modified version of the WiFly_WebClient that uses SoftwareSerial.

// (Based on WiFly's WebClient Example)
 
#include <SPI.h>
#include <WiFly.h>
#include <SoftwareSerial.h>
 
char passphrase[] = "yourpassphrase";
char ssid[] = "yourssid";
 
WiFlyClient client;
SoftwareSerial pin89Serial(8,9);
 
void setup() {
 
  Serial.begin(9600);
  pin89Serial.begin(9600);
 
  WiFly.setUart(&pin89Serial);
  WiFly.begin();
 
  if (!WiFly.join(ssid, passphrase)) {
    Serial.println("Association failed.");
    while (1) {
      // Hang on failure.
    }
  }  
 
  Serial.println("connecting...");
 
  if (client.connect("reddit.com", 80)) {
    Serial.println("connected");
    client.println("GET / HTTP/1.0");
    client.println();
  } else {
    Serial.println("connection failed");
  }
 
}
 
void loop() {
  if (client.available()) {
    char c = client.read();
    Serial.print(c);
  }
 
  if (!client.connected()) {
    Serial.println();
    Serial.println("disconnecting.");
    client.stop();
    for(;;)
      ;
  }
}

Upload that, open the serial console and you should see the HTTP output after a few seconds.

Setting up a RN-XV WiFi module without a shield

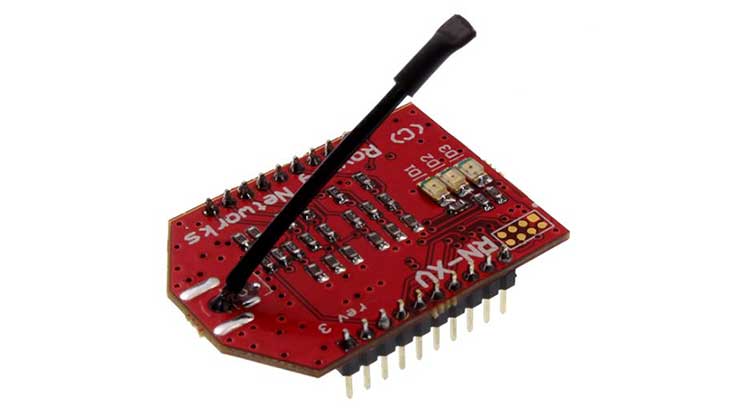
I was looking for a cheap way of getting an Arduino online and the official ethernet and wifi shields were just too expensive. coolcomponents.co.uk sell an RN-XV wifi module for around £30. There are a couple of issues I had to work through though:

Pin spacing
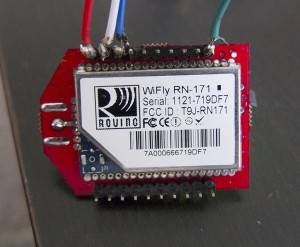
The little module has very tight pin spacing. It fits on the XBee Breakout Board but I didn’t want to spend any more so as you can see below, I did some terrible soldering to give myself direct access to 3.3V, GND, TX and RX pins. I may add some of the others later but that’s all you need to start with.

rn-xv wifi module

Getting It Set Up
There are lots of guides but they all either go through the shield, or were too complicated for my noob mind. It took me a long time but eventually after trudging through a bunch of details, I modified one of the Arduino example scripts to get me straight through to the module’s serial interface. The sketch is below:

/*
Serial Passthrough to pin 89 based on the mega multi-serial example
 */
 
#include <SoftwareSerial.h>
SoftwareSerial pin89Serial(8,9);
 
void setup() {
  // initialize both serial ports:
  Serial.begin(9600);
  pin89Serial.begin(9600);
}
 
void loop() {
  // read from port 1, send to port 0:
  if (pin89Serial.available()) {
    int inByte = pin89Serial.read();
    Serial.write(inByte); 
  }
 
  // read from port 0, send to port 1:
  if (Serial.available()) {
    int inByte = Serial.read();
    pin89Serial.write(inByte); 
  }
}

Connect your RN-XV to your arduino as listed below:

Pin 1 (3.3V) to Arduino 3.3V (DO NOT connect to 5V)
Pin 2 (TX) to Arduino pin 8
Pin 2 (RX) to Arduino pin 9
Ping 10 (GND) to Arduino GND

…and upload the sketch. If you open the serial console, you’ll probably now see some output from the module. Either way, send ‘$$$’ with ‘no line ending’. You should get the response ‘CMD’. If so, you’re all good and you can now change to ‘Carriage Return’ in the drop-down and try ‘show stats’. You should get some stat output back.

If that’s all worked then try the following to get onto your WLAN:

set wlan phrase pass-phrase
set ssid network-name
save
reboot

Once it’s successfully rebooted, I’d suggest a firmware update. It’s easy and just requires you to go back into CMD mode with ‘$$$’ (remember to turn off the carriage return), then run:

ftp update
ver

The manual suggests a factory reset so:

factory RESET
set wlan phrase pass-phrase
set ssid network-name
save
reboot

You should be all set now 🙂
There’s lots more info on the module’s page here

Puppet: The Good, The Bad, And The Config – Part 3

In the previous post the basic setup of puppet on both the server and client was described, but, because I’d rather not use their built in server (scalability issues) it’s still left to install Passenger on Apache to handle the server side of things. Details are below…

Passenger Repo and Installs

The Puppet docs suggest you use rubygem to install Passenger. Personally I prefer if everything goes in with yum to keep it all handled by one package manager. Since Passenger isn’t in any of the usual repos, add this one then install the necessary bits and pieces.

yum install httpd mod_ssl mod_passenger rubygem-rake rubygem-rack ruby-rdoc

The httpd/rack Config

First, set up a DocumentRoot for the Ruby/Rack bits and copy the config into it.

mkdir -p /etc/puppet/rack/public /etc/puppet/rack/tmp
cp /usr/share/puppet/ext/rack/files/config.ru /etc/puppet/rack/.

Create an httpd configuration for the puppetmaster. It uses mod_passenger to run the Puppet server through the more scalable Apache backend. If your network is very large, you may need to run more than one and reverse proxy them, but I’ll leave that for you to Google for if needed. Otherwise, it’ll look like this:

PassengerHighPerformance on
PassengerMaxPoolSize 15
PassengerPoolIdleTime 300
PassengerStatThrottleRate 120
PassengerUseGlobalQueue on
 
Listen 8140
 
<VirtualHost *:8140>
        SSLEngine on
        SSLProtocol -ALL +SSLv3 +TLSv1
        SSLCipherSuite ALL:!ADH:RC4+RSA:+HIGH:+MEDIUM:-LOW:-SSLv2:-EXP
 
        SSLCertificateFile      /ssl/certs/puppet1.DOMAIN.pem
        SSLCertificateKeyFile   /ssl/private_keys/puppet1.DOMAIN.pem
        SSLCertificateChainFile /ssl/ca/ca_crt.pem
        SSLCACertificateFile    /ssl/ca/ca_crt.pem
        SSLCARevocationFile     /ssl/ca/ca_crl.pem
        SSLVerifyClient optional
        SSLVerifyDepth  1
        SSLOptions +StdEnvVars
 
        RequestHeader set X-SSL-Subject %{SSL_CLIENT_S_DN}e
        RequestHeader set X-Client-DN %{SSL_CLIENT_S_DN}e
        RequestHeader set X-Client-Verify %{SSL_CLIENT_VERIFY}e
 
        DocumentRoot /etc/puppet/rack/public/
        RackBaseURI /
        <Directory /etc/puppet/rack/>
                Options None
                AllowOverride None
                Order allow,deny
                allow from all
        </Directory>
</VirtualHost>

Once that’s all in place, start httpd and make sure it starts at boot:

/etc/init.d/httpd start
chkconfig httpd on

A Test Run

Now that we’ve got a working Puppet server, we should be able to test it from the client. Run the following as root:

puppet agent --test

This should do a run, but because our default node setup is empty, won’t actually do anything.

Next Steps

I know this was a short one, but the next bit is setting up Dashboard, which is a bit more involved. Once that’s done, finally we can get to actually using Puppet for what it’s intended: managing hosts’ state.

Puppet: The Good, The Bad, And The Config – Part 2

In the previous post we went over some wordy basics of Puppet along with some quick tips. In this post we’ll actually get to the install.

Worth note, I use RHEL (well, a clone: Scientific Linux) but I’m confident that the RH specific bits are easy to translate to another distro, it’s the config that’s more important.

Yum Repos

Add the puppet repos to both client and server (I do this in the kickstart of the machines). The official repos are here. I chose http://yum.puppetlabs.com/el/6/products/x86_64/ and http://yum.puppetlabs.com/el/6/dependencies/x86_64/ because I’m on RHEL6. I believe you’ll also need EPEL for some dependencies but I’m not totally sure of this since I had it anyway (if you’re running RHEL, you’ll almost certainly want it).

Yum Install

Install puppet on both the clients and on the master (your master should be one of the clients, it needs to stay in line just as much if not more than every other client). There’s no need to install puppet-server because we’re not going to use their server, we’re going to use Apache/Passenger.

Both clients and server:

yum install puppet

Config

Puppet config is in /etc/puppet/puppet.conf. My config looks like this both on master and client (substitute DOMAIN for your domain, also, my server host is called puppet1, if yours is different, substitute that too):

[main]
    # The Puppet log directory.
    # The default value is '$vardir/log'.
    logdir = /var/log/puppet
 
    # Where Puppet PID files are kept.
    # The default value is '$vardir/run'.
    rundir = /var/run/puppet
 
    # Where SSL certificates are kept.
    # The default value is '/ssl'.
    ssldir = /ssl
 
    moduledir = /etc/puppet/modules
    server = puppet1.DOMAIN
    pluginsync = true
 
[agent]
    # The file in which puppetd stores a list of the classes
    # associated with the retrieved configuratiion.  Can be loaded in
    # the separate ``puppet`` executable using the ``--loadclasses``
    # option.
    # The default value is '$confdir/classes.txt'.
    classfile = $vardir/classes.txt
 
    # Where puppetd caches the local configuration.  An
    # extension indicating the cache format is added automatically.
    # The default value is '$confdir/localconfig'.
    localconfig = $vardir/localconfig
 
[master]
    certname = puppet1.DOMAIN

The changes to the default are the moduledir, server, pluginsync and certname parameters. moduledir and pluginsync we’ll get to later, server is so clients know where to go, and certname clearly defines the name of the puppet master server for certificate generation. I’ve had to use this because the server I’m using has a fairly random name and is CNAMEd to puppet1. Had I not provided certname, it would have used the machine’s real hostname.

Auto-signing

We’ve gone with auto-signing of client certificates. There are lots of reasons to be careful when doing this, explained here but after weighing the options, we’ve decided to go ahead with it, so on the master we’ve created /etc/puppet/autosign.conf which looks like this:

*.DOMAIN

Basic Puppet Module Config

On the master, create /etc/puppet/manifests/site.pp with the following content:

$puppetserver = 'puppet1.DOMAIN'
 
node default {
}

Certificate Generation

Run the following command on the puppet master to generate the server-side certificates.

sudo puppet master --no-daemonize --verbose

Once it’s done with the initial generation and has started the server, kill it with Ctrl-C.

Next Steps

Now, I know no client runs have actually been done yet; that’s in Part 3, where Apache/Passenger will be set up as the server so as not to use Puppet’s built in WEBrick (it doesn’t scale).

Dotsies – A New Way To Read

This is just a fantastic way to waste half an hour.

Go to http://dotsies.org/about/ and have a read. If you’re into typography or crypto (it’s not crypto, but it’s obscure enough that no-one’ll be able to read it) then I’d expect you to like this.

On their main page they use a really interesting method to help you learn the font by gradually removing the normal letters until you’re reading it unaided at the bottom of the page.

There’s a bookmarklet that lets you convert any page you’re reading to dotsies, but personally, I find it hard to read simply because the font is too small. A couple of hits of Ctrl-+ though and it’s fine.

Nerd fun 🙂